Deploy Azure Resource Manager webapp with Octopus Deploy
For the last year I have been busy with installing and configuring Octopus Deploy for different projects. One of the projects was to deploy Azure Web App. Before I created an deploy strategy with ‘msdeploy’ from an dedicated server. Since Octopus Deploy version 3.0 and higher it’s possible to select the Octopus Deploy server and start deployment to Azure Web App’s from there. Also it’s possible to have out of the box Azure deployment, I will use the Resource Manager (RM) in this example.
Before we can use the Azure Resource Manager in Octopus Deploy we need to configure your Azure account, see the official documentation about this here: http://docs.octopusdeploy.com/display/OD/Creating+an+Azure+Service+Principal+Account
Deployment flow
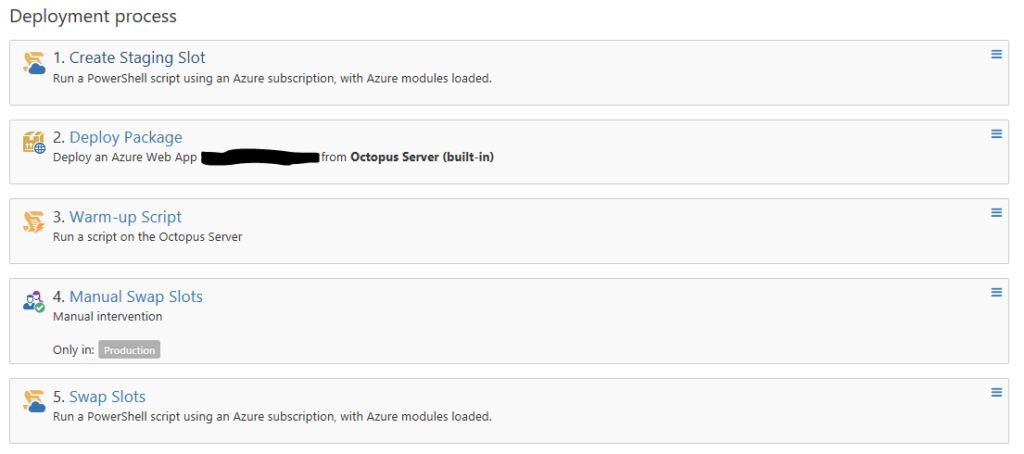
We want to deploy the Web App with minimum impact on the running one in production. To archive this in Azure we can make use of the Web App slots. Then the deployment will look like this;
- Re-create or create new staging slot.
- Configure staging slot with (new) settings.
- Deploy code to staging slot.
- Warm-up code in staging slot.
- Swap production with staging slot.
Before we swap production with staging we can add an manual step that needs approval for the user. In Octopus Deploy it will look like this when everything is configured;
Re-create or create new staging slot
In our example I assume the Web App is already created in Azure and is running the current production. With this first step we create an empty slot where we can later deploy code to. Keep in mind that we use the Resource Manager, so Azure Powershell should contain only the Resource Manager commands. Add the step template ‘Run an Azure PowerShell Script ‘, choose youre Azure RM account and add the following code:
# Check if staging slot exists
$count = (Get-AzureRmWebAppSlot -ResourceGroupName #{resourceGroupName} -Name #{webappName}).Count
if($count -ne 0)
{
  #Remove the staging slot if it exists
  Remove-AzureRMWebAppSlot -Name #{webappName} -Slot Staging -ResourceGroupName #{resourceGroupName} -Force
}
# Create new staging slot
New-AzureRMWebAppSlot -Name #{webappName} -Slot Staging -ResourceGroupName #{resourceGroupName}
In this PowerShell script I have used 2 Octopus variables, webappName and resourceGroupName. This variables can be configured in the same project, this has the benefit of having different variable values per environment.
Configure staging slot with (new) settings
Because we use Azure Resource Manager also the settings powershell script need to be done with RM. See example here:
# Configure staging slot
$AppSettings = @{ `
  "WEBSITE_HTTPLOGGING_RETENTION_DAYS" = "30"; `
  "WEBSITE_HTTPLOGGING_CONTAINER_URL" = "https://yourownblob.blob.core.windows.net/wad-iis-logfiles?sv=2012-02-12&sr=c&si=portalsaspolicy&sig=yoursecret"; `
 }

Set-AzureRmWebAppSlot `
 -NetFrameworkVersion v4.0 `
 -PhpVersion Off `
 -RequestTracingEnabled $False `
 -HttpLoggingEnabled $True `
 -DetailedErrorLoggingEnabled $False `
 -AppSettings $AppSettings `
 -ManagedPipelineMode Integrated `
 -WebSocketsEnabled $False `
 -Use32BitWorkerProcess $False `
 -ResourceGroupName #{resourceGroupName} `
 -Name #{website} `
 -Slot Staging
Again we are using the variables out the Octopus project for this script to configure the staging slot. Make sure you check the settings in Azure Portal, there you can configure App Settings as an ‘slot setting’ that will prefend to be updates during slot swap. You can add this to your first step “Run an Azure PowerShell Script” template.
Deploy code to staging slot
With the integrated Octopus Deploy templates this will be the easiest step. Use the Octopus variable ‘#{webappName}(Staging)’ as Web App name and ‘#{resourceGroupName}’ as Resource Group name. With ‘(staging)’ behind the web app name you make sure your NuGet package is deployed in the staging slot!
Use the default Octopus template ‘Deploy an Azure Web App’ to configure this step.
Warm-up code in staging slot
This is an mandatory step that you can add in Octopus Deploy to make sure your application is working. Just as an example you can use the tempale ‘Run a script’ and add this customized Powershell script;
Try {
Invoke-WebRequest -UseBasicParsing -Uri http://www.google.nl
}
Catch {
Write-Error 'Error occured'
}
Swap production with staging slot
The last step is to execute the swap slots, here your changes are going live to production. Add this in the step template “Run an Azure PowerShell Script” with (again) the Azure RM credentials;
#Swap the staging slot into production
$ParametersObject = @{targetSlot  = "Production"}
Invoke-AzureRmResourceAction -ResourceGroupName #{resourceGroupName} -ResourceType Microsoft.Web/sites/slots -ResourceName #{webappName}/Staging -Action slotsswap -Parameters $ParametersObject -ApiVersion 2015-07-01 -Force
Stop-AzureRmWebAppSlot -ResourceGroupName #{resourceGroupName} -Name #{webappName} -Slot Staging
Again we are using the variables out the Octopus deploy project. This Powershell script will swap slots and also stop the Staging slot, stopping is needed to make sure the Staging slot is not consuming resources from the web app. In Azure the slots from an Web App are using the same resources as the production one.