Simple ASP.NET Core WebAPI
With .NET Core that is available on GitHub it’s now possible to start developing with the .NET framework on different Operating Systems. Also it make the run/test process really quick. In this how-to we will create an webapi to display City names. Let’s start with the preparation and install Microsoft Visual Studio and .NET Core SDK.
Visual Studio
To start an new project Visual Studio can create projects and add auto fill functions during coding. To start the Community edition contains enough features to start building in .NET. Download can be found here: https://www.visualstudio.com/products/vs-2015-product-editions
.NET Core
After Visual Studio is installed you can install .NET Core SDK and the Visual Studio tools from this link: https://www.microsoft.com/net/core#windows . During both installation I didn’t find any issues, so nothing to report.
Create the Web API in C# .NET Core
Let’s start with creating a new project in Visual Studio.
- Start Visual Studio
- Go to New > Project
- Choose under Templates > Visual C# > Web > ASP.NET Core Web Application (.NET Core).
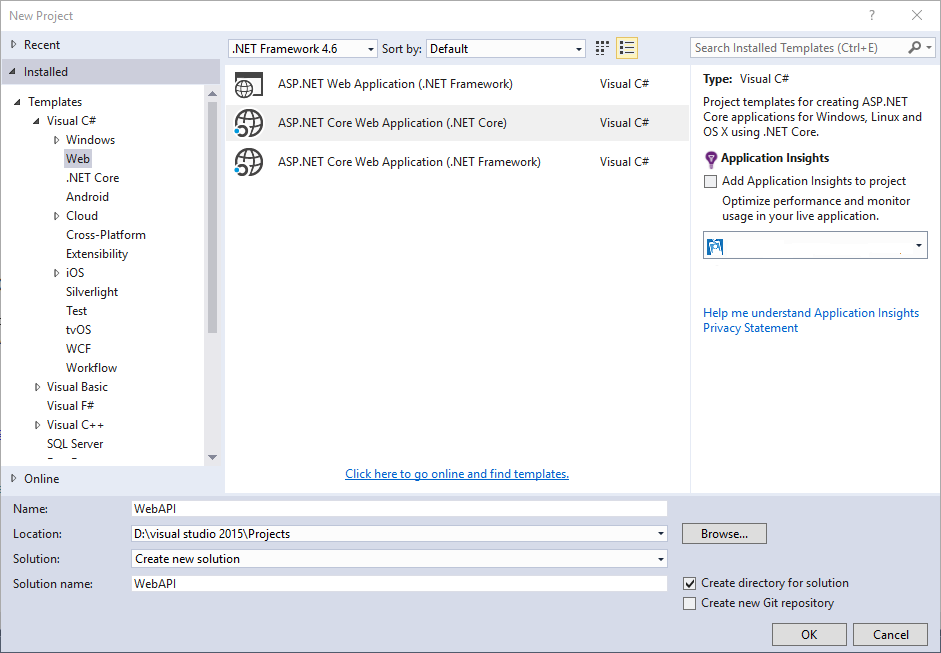
- Click OK and the folder will be created. Next screen we choose the Web API
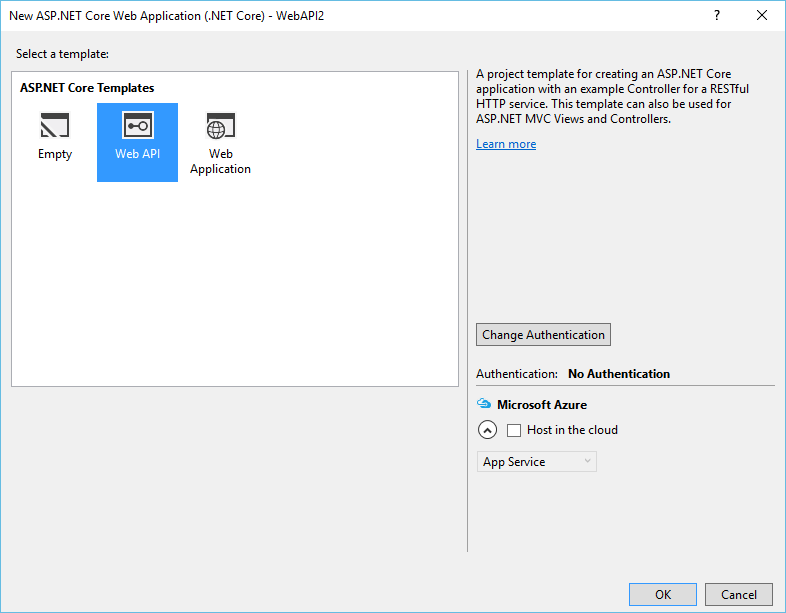
- When you click OK the project will be created and opened.
Start writing C# code
We will start with an small Web API response to illustrate how this works. In this example we will create an list of city names.
- Create an new folder Models in the WebAPI project.
- Right click the Models folder and choose Add > New Item , go to the .NET Core and choose Class. Fill in the name “City.cs” and click on Add.
- Create the class in City.cs for our City list:
namespace WebAPI.Models { public class City { public string Key { get; set; } public string CityName { get; set; } } } - Now create the 3th file in the Models folder containing the interface, call the file “InterfaceCityList.cs” and add the following code:
public interface InterfaceCityList
{
  void Add(City item);
  IEnumerable<City> Get();
}
Again paste this code between the namespace brackets.
- Next we gone create an Dictionary that contains the Cities. Create a new class file named “CityList.cs” and add the following code. Add in the top:
using System.Collections.Concurrent;
And add between the namespace brackets;
public class CityList: InterfaceCityList
{
 private static ConcurrentDictionary<string, City> _cities =
 new ConcurrentDictionary<string, City>();

 public CityList()
 {
   Add(new City{ Name = "New York" });
 }

 public IEnumerable<City> Get()
 {
   return _cities.Values;
 }

 public void Add(City item)
 {
   item.Key = Guid.NewGuid().ToString();
   _cities[item.Key] = item;
 }
}
This code creates the Dictionary and add 1 item to it. Also the contains the code to get all items. Make sure you paste this code inside the namespace.
- Now it’s time to create the controller that handles the Web API calls. Delete the controller file “ValuesControllers.cs” out the folder Controllers and add an new item Web API Controller Class:
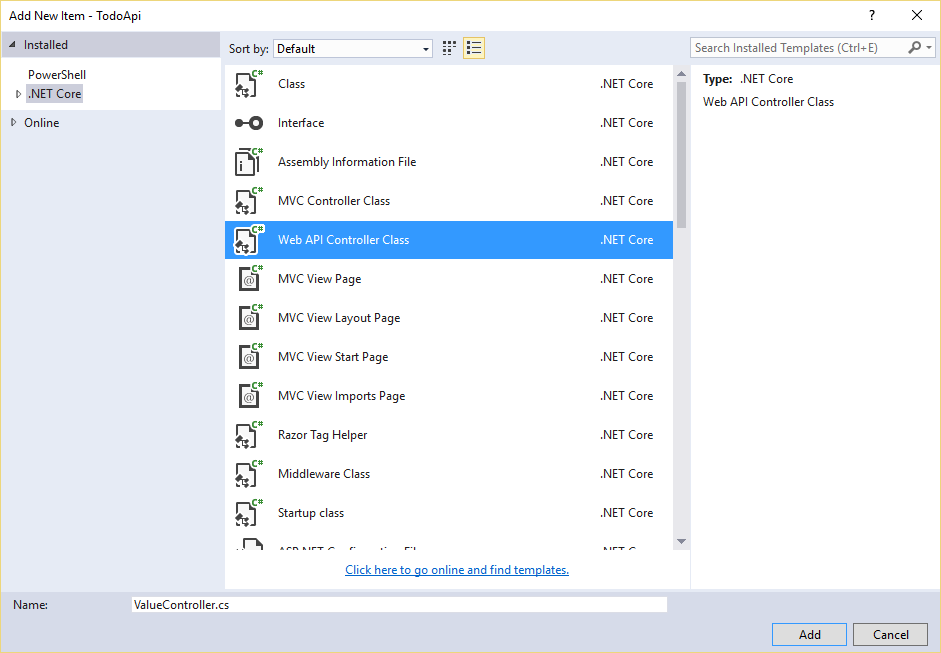
- Give it the name “CityController.cs” , add the following code.
using System; using System.Collections.Generic; using System.Linq; using System.Threading.Tasks; using Microsoft.AspNetCore.Mvc; using WebAPI.Models; namespace WebAPI.Controllers { [Route("api/[controller]")] public class CityController : Controller { public CityController(InterfaceCityList CityList) { cityList = CityList; } public InterfaceCityList cityList { get; set; } // GET: api/city [HttpGet] public IEnumerable<City> Get() { return cityList.Get(); } } } - Now the Models and Controllers are created we can add this to the Startup.cs in the root of your project. Add in top of the Startup.cs file:
using WebAPI.Models;
and under services.AddMvc();
// Add Todo Models
 services.AddSingleton<InterfaceCityList, cityList>();
- Now Run the project , make sure you use the Project name ( NOT IIS Express).
- The browser will be started now an use /api/city to get an JSON output back with the city New York.
Other good tutorials can be found here: https://docs.asp.net/en/latest/tutorials/first-web-api.html
Download the code from GitHub: https://github.com/solracblog/Example-NETcore-WebAPI
Have fun playing with .NET Core!